How to Frame and Style Your Photos
Framing your favourite photos and using them when styling each room is a great way to freshen up those forgotten spaces in your home.
Framing your images may seem easy, however, it’s an important aspect to get right. There are a few key points to remember when styling framed photos, so we’ve put together a small guide to help you get it just right. Creating a tranquil space is all in the details.

Framing Your Photos
Choosing a colour palette to run throughout your framed photos creates a sense of unity and can really tie a room together. For example, we are going to continue the monochrome theme in our room and have chosen to use a variation of black and white images, and will frame these with a few white and grey frames.

Start by choosing your images; we’d recommend a few different ratios. We think that the 6x8, 10x8, 6x6 and 5x7 sizes work really well. Using a variation of heights like this can really balance out your space. Before you start make sure your mount boards are sized correctly, as you want to make sure each image sits perfectly in the frame. It can be tricky to open your frames - you might find it much easier to do this using a teaspoon or butter knife.
TIP: Use masking tape to secure your photos onto the mount boards - you don’t want them slipping around!

Place your mounted photos into the frame, making sure they sit in there nicely and repeat the process with all of your chosen images.
Style Your Framed Photos
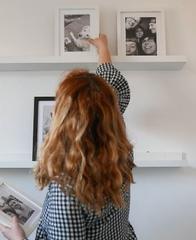
Once you have chosen your images and have successfully framed them you’ll need to find a place to display them. Try styling your images on small shelves like picture ledges, or if you don’t have access to shelves keep it simple and use your window sill or side table. Using shelves to style your printed photos is a great way to add character without having the added hassle of hanging each frame up and marking the walls. It also makes it easier to change things around and mix up the colour palette.
Be sure to start with the larger frames first and make sure to add these at opposite ends to get the balance just right. Once your photos are all in place, add a few books and magazines to your shelves, making sure each one picks out the colours in each framed image. It’s also a nice idea to add little postcards or cut-outs to layer in front of your frames. We love how these simple mementos can bring your memories to life.
Now to add the detail. Accessorise your shelves with candles, plants, flowers and reed diffusers. Make sure everything you add in follows your chosen colour palette. When your shelves are full, don’t be afraid to play around with the composition - it might take a few tries to get right!
The great thing about framing your photos and adding them to shelves like this is that you can change things around easily - if you are forever re-styling your home these framed photos make a great feature and add so much character.

Your home is an amazing place, it’s somewhere to relax, unwind and feel safe. Surrounding yourself with memories and making sure the space around you fills you with joy, is so important.
You can use these styling tips to help you freshen up each room in the house.
Make sure to head to myFUJIFILM.co.uk and start printing your favorite photos.
We can’t wait to see how you get on freshening up your space with your framed photos!
Written by Harriet Langsbury (@harrietlangsburystylist)
